Optima Onboarding
New Joiner’s Handbook
By Venkateswarlu Routhu, last updated on 21 Nov 2023.
Introduction
Welcome to Team Optima!
Greetings,
We are delighted to welcome you to Team Optima. As part of our team, you join a group dedicated to excellence, innovation, and collaboration. Our journey is one of continuous learning, where each challenge is an opportunity for growth. Your unique skills and perspectives are valuable additions to our team, and we look forward to achieving great things together. Welcome aboard!
Best wishes,
The Team Optima Leadership
Our Vision and Core Values
At Team Optima, we are united by a common vision to create impactful solutions through innovation and collaboration. Our core values include:
- Innovation: Embracing new ideas and creative solutions.
- Collaboration: Working together to achieve our goals.
- Integrity: Committing to honesty and transparency.
- Excellence: Pursuing the highest standards in our work.
- Continuous Learning: Always seeking to grow and improve.
We encourage you to embody these values in your contributions to our team.
Key Contacts
To help you get started, here are some important contacts:
- Service-Level Owner: Naik, Sriram P
- Technical Owner: Krishnamohan J
- Business Owner: Kunchala, Panidhar
Feel free to reach out to these individuals for any assistance or guidance as you begin your journey with us.
Getting Started with Onboarding
Introduction to Optima
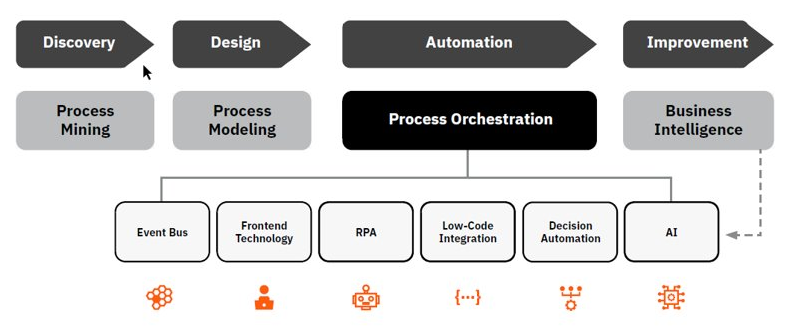
Welcome to Plaform Optima, Optima is not just a tool; it's a transformative ecosystem crafted to redefine our approach to workflow and decision automation.
Core Philosophy of Optima
Optima is built upon the principle that process automation should be intuitive, scalable, and seamlessly integrated into our daily operations. We believe in empowering teams to design, implement, and optimize workflows that are as dynamic as the business challenges they address.
What Makes Optima Stand Out?
- Self-Hosted Versatility: By hosting Camunda on our own servers, we maintain complete control over our workflow environment, ensuring security, customization, and performance tailored to our specific needs.
- Streamlined Workflow Design: Optima offers a user-friendly interface for creating and managing complex workflows, making it accessible to both technical and non-technical users.
- Advanced Decision Automation: Leveraging Camunda's powerful decision automation capabilities, Optima enables us to make smarter, data-driven decisions, enhancing both efficiency and effectiveness.
- Integration-Friendly Architecture: Designed to be highly compatible with our existing systems, Optima integrates smoothly with a variety of tools and platforms, ensuring a cohesive and interconnected IT ecosystem.
- Community and Support: As part of the Optima community, you have access to a wealth of knowledge, best practices, and support from both internal experts and fellow users.
Your Role in Optima
As a new member of our team, you will play a crucial role in harnessing the power of Optima. Whether you're designing new workflows, optimizing existing processes, or contributing to strategic decision-making, your work on Optima will be pivotal in driving our organization forward.
Training Materials and Resources
To help you get up to speed with Optima, we have compiled a range of training materials:
- Getting Started Guides: Step-by-step guides to introduce you to the basic functionalities of Optima.
- Video Tutorials: Video resources for a more interactive learning experience.
- Documentation Library: In-depth documentation for a comprehensive understanding of the platform.
- Interactive Learning Modules: Engage with hands-on modules to apply your learning in a practical setting.
These resources are designed to cater to different learning styles and to provide a thorough understanding of the Optima platform. You will find them in our [internal resource repository/intranet].
IT Policies
Best Practices
Our IT security policies are designed to protect our systems, data, and intellectual property:
- Password Policy: Use strong, unique passwords for each system and change them regularly. Avoid sharing your passwords.
- Data Protection: Handle sensitive data with care. Follow our data encryption and storage guidelines to ensure confidentiality and integrity.
- Software Usage: Only use approved software and update regularly to ensure security patches are applied.
- Incident Reporting: Immediately report any suspicious activities or security incidents to the IT security team.
Confidentiality and Data Protection Guidelines
Protecting confidential information is everyone's responsibility:
- Access to Confidential Information: Access confidential information only if it is essential for your work.
- Sharing Information: Be cautious when sharing sensitive information. Use secure channels and ensure the recipient is authorized to receive it.
- Data Privacy Compliance: Adhere to data privacy laws and regulations applicable to our operations and client data.
Access Permissions
Consult with Your Manager: Before initiating any request, discuss your access needs with your manager. This ensures alignment with your role's requirements and team objectives.
PPM Optics
PPM Optics or the PPMO is the time track/timesheet tool where you should enter your project hours in day-to-day basis under either work item assigned to you or under Workload, Knowledge & Staff Transition. You should enter 8.50 hours against each day in the PPMO timesheet.
Link to PPM Optics
Following are the steps to request PPMO.
- Go to Secure
- Click on Add Group Membership under Primary Windows Account
- Select Request For: Application. Click Next.
- Search for PPM Optics and select the item. Click Next.
- In the next screen, you can go through the instructions and Click Next.
- Under "User IDs" section, select Your User ID or if your User ID is not displayed then click Create New User-ID option. Click Next.
- In the next screen, select Team Member under Optum Technology & Idea Requesters role. Click Next.
- Verify your request, enter description and submit the request.
- You can track your request status from the Request History tab at the top right hand side navigation options.
Follow-Up Steps After Gaining Access
-
At the end of every week, timesheet should be filled against your assignments in PPMI. For more information or help, Please look into PPMO Guide
-
Investment ID to be used.You will get email when project assignment is done. Get in touch with your project manager for this.

Rally
Rally is a project management tool used to track each phase of the development iterations and releases.
Link to Optima Rally Team Board
Following are the steps to request Rally.
- Go to Secure
- Click on Add Group Membership under Primary Windows Account
- Select Request For: Application. Click Next.
- Search for Rally and select the item. Click Next.
- In the next screen, you can go through the instructions and Click Next.
- Under "User IDs" section, select Your User ID or if your User ID is not displayed then click Create New User-ID option. Click Next.
- In the next screen, select Workspace User under Recommended Role role. Click Next.
- Enter UHG in Workspace and Optima in Project
- Verify your request, enter description and submit the request.
- You can track your request status from the Request History tab at the top right hand side navigation options.
Follow-Up Steps After Gaining Access
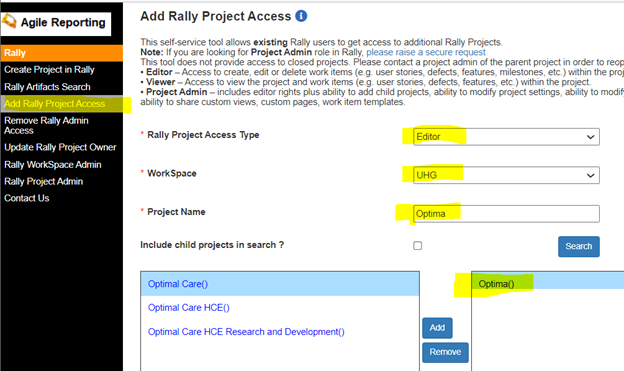
- Go to Rally Project Access
- Give Access Type: Editor, Workspace: UHG, Project: Optima
 - Once you have above accesses, you should be able to see data under Optima team board Optima Team Board
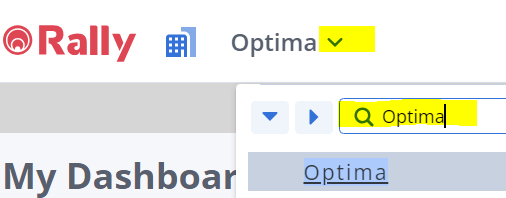
- If direct url doesn’t work, search for Optima, under project as shown in the diagram
- Once you have above accesses, you should be able to see data under Optima team board Optima Team Board
- If direct url doesn’t work, search for Optima, under project as shown in the diagram
GitHub
Optum has its own GitHub Repository for all codebase persistence.
Link to GitHub
Following are the steps to request GitHub.
- Go to Secure
- Click on Add Group Membership under Primary Windows Account
- Select Request For: Platform Click Next.
- Select Windows and MS options. Click Next.
- Under "User IDs" section, select Your User ID or if your User ID is not displayed then click Create New User-ID option. Click Next.
- In the next screen, search and select following Groups Click Next.
- github_users
- AZU_GHEC_USERS
- AZU_OPTIMA_CONTRIBUTOR
- Verify your request, enter description and submit the request.
- You can track your request status from the Request History tab at the top right hand side navigation options.
VDI Upgrade
If you are VDI user and want to upgrade your VDI configuration
Following are the steps to upgrade/modify VDI.
- Go to Secure
- Click on Add Group Membership under Primary Windows Account
- Select Request For: Platform. Click Next.
- Select Windows and MS options. Click Next.
- Under "User IDs" section, select Your User ID or if your User ID is not displayed then click Create New User-ID option. Click Next.
- In the next screen, search and select "EUTSD_Tech_Hub_VDI_User_Actions” under "Group(s)". Click Next.
- Verify your request, enter description and submit the request.
- You can track your request status from the Request History tab at the top right hand side navigation options.
Follow-Up Steps After Gaining Access
-
Go to VDI Dashboard
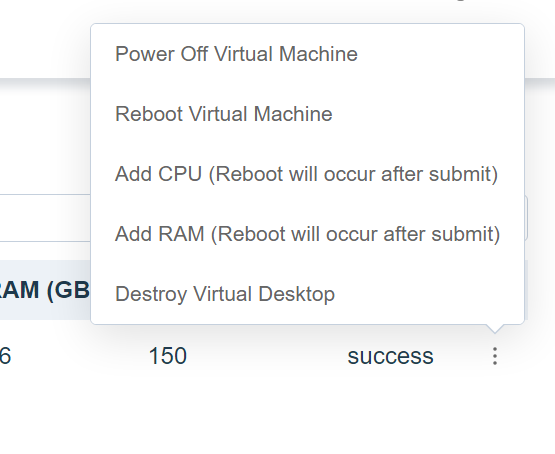
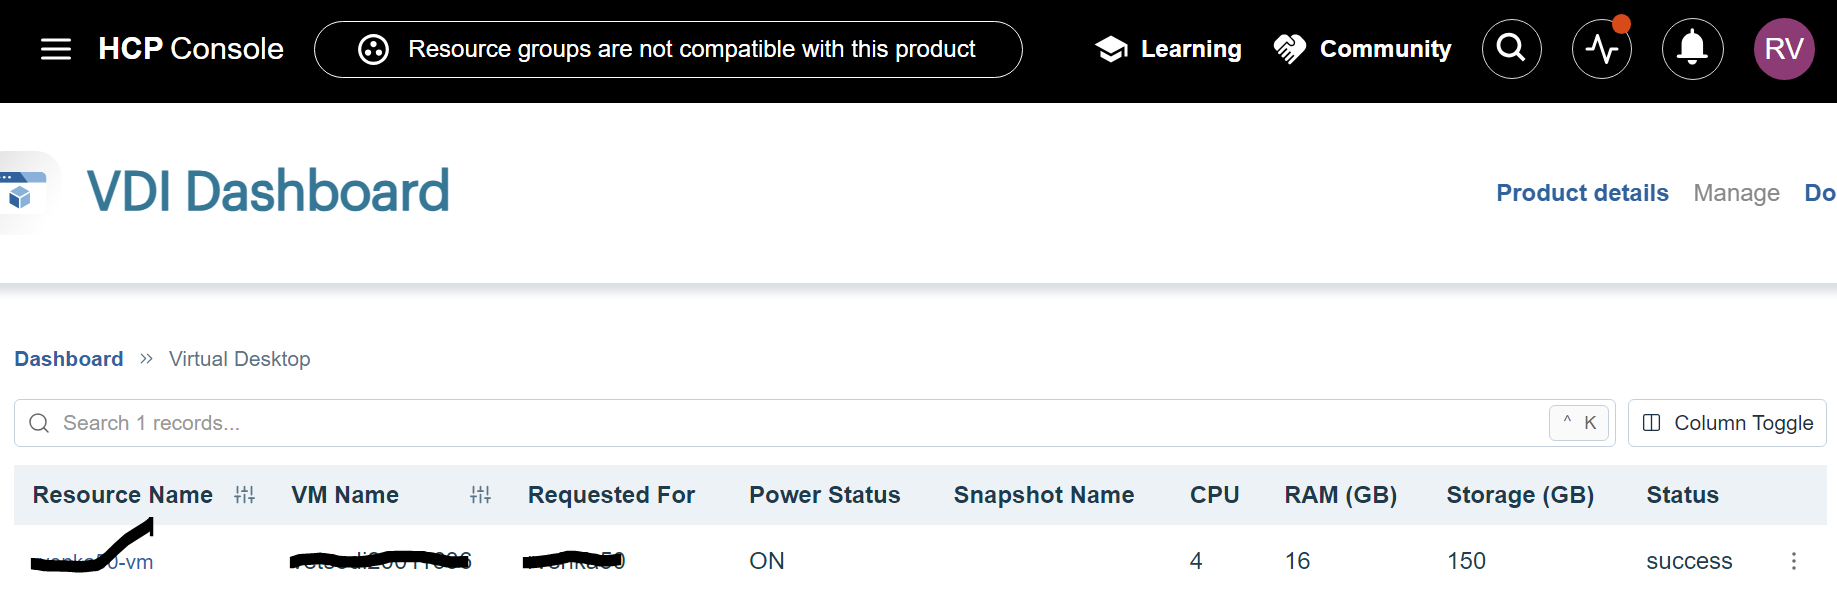 - Add CPU and RAM according to your needs.
Optima Tenant Access
Optima using different tenants for different purposes.
Following are the steps to request tenant level access.
- Go to Secure
- Click on Add Group Membership under Primary Windows Account
- Select Request For: Platform. Click Next.
- Select Windows and MS options. Click Next.
- Under "User IDs" section, select Your User ID or if your User ID is not displayed then click "Create New User-ID" option. Click Next.
- In the next screen, search and select following Groups Click Next.
- OPTIMA_TENANT_DEV_ORX_DEV_RXBPM
- OPTIMA_TENANT_DEV_OPTIMA_INTERNAL
- Verify your request, enter description and submit the request.
- You can track your request status from the Request History tab at the top right hand side navigation options.
UHG Azure
In order to access UHG Azure cloud account, you need to get access to Pharmacy Services contributors Secure Group.
More details can be found here.
Please request access to the following two Secure Groups.
| Account | Secure Group – Azure Access |
|---|---|
| ORx Pharmacy Services (10ed8611-196b-4cca-9e97-2729be903634) | AZU_10ed8611_196b_4cca_9e97_2729be903634_Contributors |
| ORxPharmacyServices (b4f24c37-de92-4f78-809d-d521ce05ea7f) | AZU_b4f24c37_de92_4f78_809d_d521ce05ea7f_Contributors |
Link to Microsoft Azure
Sample UHG Azure User ID [usaemane@optumcloud.com]
Following are the steps to request UHG Azure.
- Go to Secure
- Click on Add Group Membership under Primary Windows Account
- Select Request For: Platform Click Next.
- Select Azure and UHG Azure options. Click Next.
- Under "User IDs" section, select Your User ID or if your User ID is not displayed then click Create New User-ID option. Click Next.
- In the next screen, search and under Group(s) search for the Secure Groups mentioned above in the table i.e. " AZU_43b3ffba_7c41_4aeb_846c_917e32883464_Contributors " Click Next.
- Verify your request, enter description and submit the request.
- You can track your request status from the Request History tab at the top right hand side navigation options.
Follow-Up Steps After Gaining Access
- Go to Microsoft Azure
- Login with UHG Azure User ID and UHG Azure Initial Password
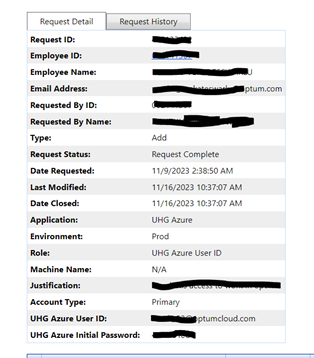
- Post login, follow remain process to configure MFA.
- You will be directed to Azure portal once above step is completed successfully.
Connecting to Cluster in OpenLens
- Go to Microsoft Azure
- Login with UHG Azure User ID and UHG Azure Initial Password.
- Click on Kubernetes services.
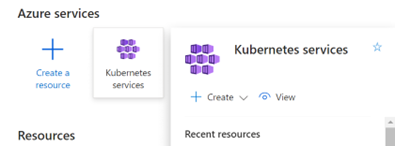
-
Select cluster which you would like to configure and click on it.

-
Click on Connect
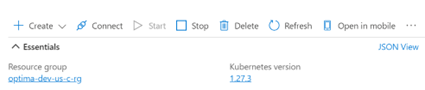
-
Follow steps shown in connect page.
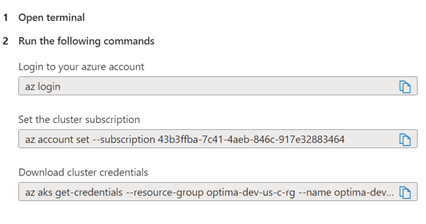
Splunk Observability Access
Splunk is a software platform to search, analyze and visualize the machine-generated data gathered from the websites, applications, sensors, devices etc. which make up your IT infrastructure and business.
Optima is using Splunk for Monitoring Purpose.
Following are the steps to request tenant level access.
- Go to Secure
- Click on Add Group Membership under Primary Windows Account
- Select Request For: Platform. Click Next.
- Select Windows and MS options. Click Next.
- Under "User IDs" section, select Your User ID or if your User ID is not displayed then click "Create New User-ID" option. Click Next.
- In the next screen, search and select following Group(s) Click Next.
- AZU_ORX_SplunkO
- Verify your request, enter description and submit the request.
- You can track your request status from the Request History tab at the top right hand side navigation options.
Mobility@Work
Mobility@Work allows you to work when, where, and how you want to by accessing a catalog of enterprise applications from personal mobile devices, computers, tablets, and corporate-owned mobile devices.
The modern digital workspace platform extends your productivity into the mobile environment. It provides access to our most popular applications, including Outlook, Edge Web Browser, and Microsoft Teams.
Following are the steps to request tenant level access.
- Go to ServiceNow
- Click the checkbox “I've read the above and want to request access” and click Continue.
- Select Request For: Yourself.
- Select MS ID: Your MSID.
- Click on Submit
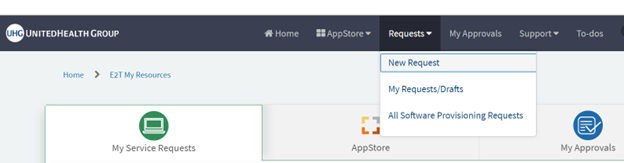
You can track the request and Requests -> My Requests/Drafts.
ServiceNow
You need access to ITSM – IT Service Management in order to work with On-Call-Schedules.
Link to On-Call-Schedules
Following are the steps to request ServiceNow ITSM IT Technician.
- Go to Secure
- Click on Add Group Membership under Primary Windows Account
- Select Request For: Application. Click Next.
- In the next tab search for "ServiceNow" and select "ServiceNow (Optum)". and then search for "ITSM" followed by select "ITSM - IT Service Management". Click Next.
- Under "User IDs" section, select your User ID or if your User ID is not displayed then click "Create New User-ID" option. Click Next.
- In the next tab, select "ITSM IT Technician" under "Role". Click Next.
- Verify your request, enter description and submit the request.
- You can track your request status from the Request History tab at the top right hand side navigation options.
Development Environment Setup
Setting up your development environment is a key step in your onboarding process. This section provides guidance on configuring the necessary tools and platforms to ensure a smooth start to your development work at Team Optima.
Essential Software and Tools
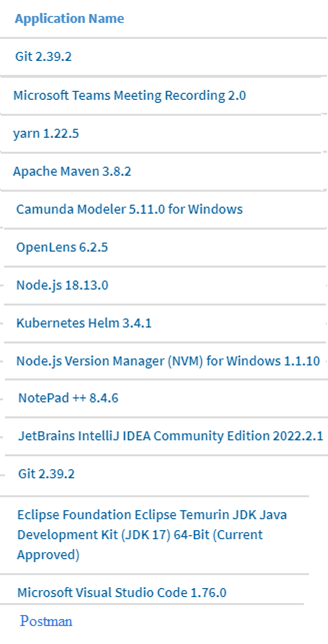
To begin your development work, you'll need to install certain essential software and tools. Here is list of software/tools that you might need to install from AppStore.
Please choose software/tools based on your role and responsiblities. Not all the software/tools are required for everyone
Please always choose software/tools marked as Preferred or Acceptable**
Configuring Your Workspace
Optime Gateway
Pre-requisites
- Java 17
- Intellij IDE
- Access to https://github.com/optum-rx-platformintegration/
Install from AppStore if you dont have in yout machine.
Workspace Setup
-
Use the Git command
git clone [repository URL]to clone the desired repository to your local machine. This will create a copy of the codebase that you can work on.URL: https://github.com/optum-rx-platformintegration/optima-gateway/
-
Start IntelliJ IDEA and select 'Open' from the welcome screen. Navigate to your project directory and select the project to open it in IntelliJ.
- It should import all the necessary dependencies otherwise do Maven->Install
-
Once all the dependencies are imported successfully. Add below environment variables.

 5. Apply the configuration. Run the Application. 6. Import all the certificates related to environment. For More Information please refer Certificate Import section.
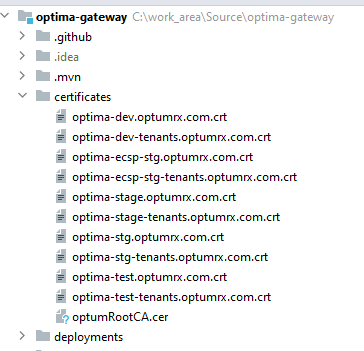
ACTUATOR_ENDPOINTS=health,info;API_HOST_URL=https://optima-dev.orxcoreplatform.optum.com;AUTHORIZE_API_LEVEL=true;AUTHORIZE_MODULE_LEVEL=false;AUTHPASS_API_AUTH_TOKEN=auth/token;AUTHPASS_API_GET_ENTITLEMENTS_ALL_SUBJECTS=permissions/lookup/resource;AUTHPASS_API_PERMISSION_CHECK=permissions/check;AUTHPASS_API_RELATION_CREATE=permissions/relations;AUTHPASS_API_RELATION_DELETE=permissions/relations;AUTHPASS_API_RELATION_READ=permissions/relations/read;AUTHPASS_CONTEXT_PATH=authpass/v1;AUTHPASS_TENANT_CLIENT_ID=545dd137-f6de-4468-b6a3-0c9cea1252a2;AUTHPASS_TENANT_CLIENT_SECRET=5XN8mb)i88ScRV5RTNS@)DMS4SEapq5j3F5$m%Vka3tin#8v)w9@dlDI0qdQ;AUTHPASS_TENANT_NAME=Optima;AUTHPASS_URL=https://stage-api-authpass.optumrx.com;IDENTITY_CONTEXT_PATH=identity;ISSUERS_LIST=master;KEYCLOAK_HOST=https://keycloak-dev.orxcoreplatform.optum.com;LOG_LEVEL=DEBUG;MICROSTREAMS_STORAGE_PATH=mnt/microstream;OPERATE_CONTEXT_PATH=operate;OPTIMIZE_CONTEXT_PATH=optimize;REALM_MASTER_NAME=master;REALM_MASTER_PASSWORD=NIrIwmIidat0NzPdqFtcVmA9l476p4BB;REALM_MASTER_USERNAME=platform-admin;TASKLIST_CONTEXT_PATH=tasklist;TENANT_HOST_URL=https://optima-dev.orxcoreplatform.optum.com;ZEEBE_GATEWAY_ADDRESS=localhost:26500Example: Import optima-dev.optumrx.com.crt and optima-dev-tenants.optumrx.com.crt
7. Run the Application. 8. Application will be runnin on http://localhost:8080/. Swagger UI can be found on http://localhost:8080/optima-gateway/swagger-ui/index.html
Certificate Import
Certificates needs to be imported to connect with diffrent compoents. Import all the certificates related to the enviroment which you are connecting to.
Certificate Import On Mac
-
Enable the access admin on your mac, and paste the absolute path of each certificate after – file(absolute path) in the following command to import certificate. Do the same for other certificates.
2. If it asks for password then put the password as changeit and then hit enter
Certificate Import On Windows
-
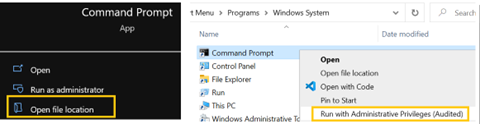
Open following location in windows explorer.
C:\Users\<MSID>\AppData\Roaming\Microsoft\Windows\Start Menu\Programs\System Tools -
Right click on Command Prompt. Make sure you have access Run with Administrator Privileges. Otherwise request for secure access group ASAM_Developer_Elevation in Secure. You need to restart VDI to enable Run with Administrator Privileges.
 3. Run the below command like below to import the certificates
Sample commands
1. keytool -importcert -trustcacerts -alias  keycloak-dev-certi -keystore "C:\Program Files\Eclipse Adoptium\jdk-17.0.6.10-hotspot\lib\security\cacerts" -file "C:\Project\optima-gateway\certificates-dev\keycloak-dev.orxcoreplatform.optum.com.crt"

2. keytool -importcert -trustcacerts -alias optima-dev-case-certi -keystore "C:\Program Files\Eclipse Adoptium\jdk-17.0.6.10-hotspot\lib\security\cacerts" -file "C:\Project\optima-gateway\certificates-dev\optima-dev-case-management.orxcoreplatform.optum.com.crt"

3. keytool -importcert -trustcacerts -alias optima-dev.orx-certi -keystore "C:\Program Files\Eclipse Adoptium\jdk-17.0.6.10-hotspot\lib\security\cacerts" -file "C:\Project\optima-gateway\certificates-dev\optima-dev.orxcoreplatform.optum.com.crt"

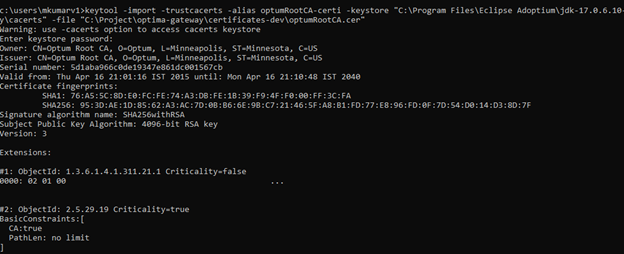
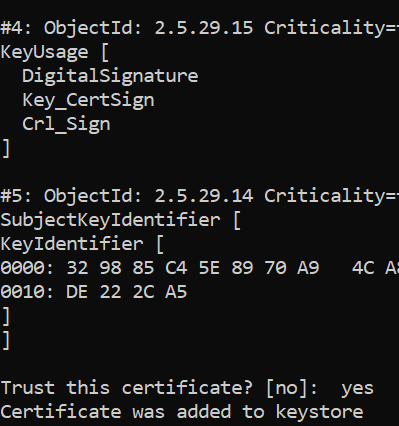
4.keytool -importcert -trustcacerts -alias optumRootCA-certi -keystore "C:\Program Files\Eclipse Adoptium\jdk-17.0.6.10-hotspot\lib\security\cacerts" -file "C:\Project\optima-gateway\certificates-dev\optumRootCA.cer"